|
After the successful first start of the engine, I was rather pleased with
the results of the work I did until now. Hearing the sound of engine for the
first time is always a milestone in a restoration project. And since I started
from a pile of parts in a box, this was more than a milestone for me.
After that I mounted the exhaust system, a rather straightforward job. I
just had to reshape the pipe that comes to the exhaust collector, because that
pipe runs through the chassis. It has to be in the centre of the hole thats in
the chassis, to avoid that it would rattle against it. No problem, a bit of elbow
grease and the heat of the welding flame did the trick.
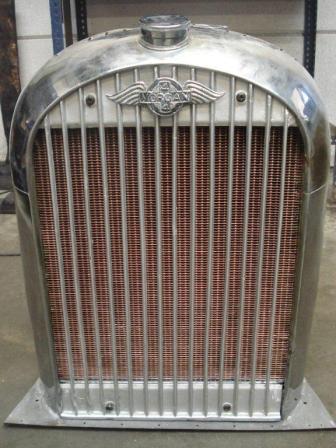
Until now I always walked around it, but now the next thing to do is the
radiator. Not only to go further with the engine, but also because I need the
radiator shell to outline the body parts. But as I mentioned before I had a big
problem regarding the costs of a new radiator, and so I had to find a cheaper
way to fix it. To have it re-chromed it has to be an empty radiator shell, so I
have to find someone that can make me a radiator that fits inside the original
shell, it is the only solution.
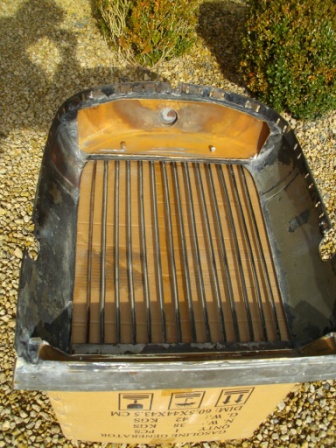
To find someone that can make me what I have in mind, I cut out the old radiator
core, to find out how much space I have inside the shell. Then I made an
technical drawing of the new radiator to my idea, and presented that to about 5
radiator specialists.
I had several reactions from the type yes we can do that, and one that
came with al lot of good suggestions about it, straight from the first contact.
I realised; this is the man I need. He is not only thinking in the same
direction as I do, but thinks even more forward with a lot more knowledge. And
that he was the cheapest of them all, was another great advantage too J.
After an extra telephone call I brought my radiator to his shop in
Oudenaarde, and there he bombed me with facts and tips about how he would build
it, as was it his owne. We agreed that he could do it in spare moments, because
a few weeks extra was no problem for me, and that he would keep me posted about
his progression. So I left my precious part in his good hands and left,
convinced that I have found the right guy.
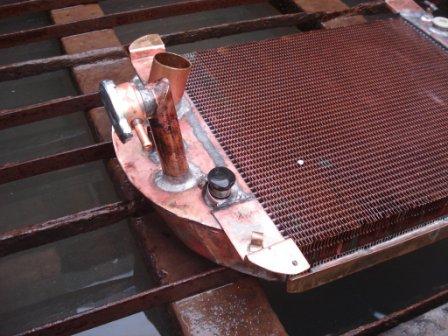
After a few days I already received the first photographs of the naked
radiator core he was going to use, and that mail traffic would go on for a few
weeks, until the radiator was finished. He made some good changes on my
original plan, but always after discussing that first with me. The finished
product is perfect, and I had it in a 4 weeks. Thanks Koenraad Wynants, you are
a great guy and a true professional with hart for your job.
Then I found it was time to restart my restoration, it has been
neglected again too long. My first good intention for 2013 is: to work on it a
half day at least every week. I hope I will keep it J.
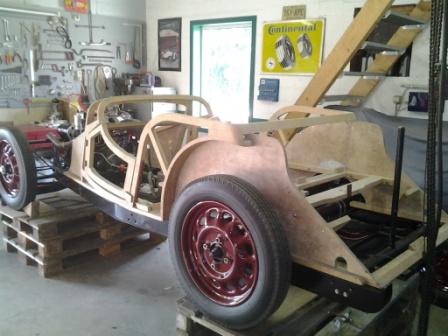
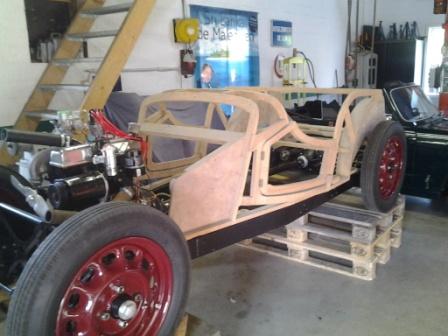
As a start I took the skeleton body from the loft an gave it an extra
layer of a wood preserving product, so the bad bugs would not eat it J. It looked
very nice afterwards, in fact it is a shame that you cannot see it once the car
is finished.
Then I measured it out on the chassis, and in the length it all looks
correct. Then I just had to line it out following the inside chassis shape, also
a piece of cake. So time to lift it a little bit, put some sealing-like product
between body and chassis, and put it on his final place. Then I drilled the
holes for the fixing bolts, and bolted the woodwork on the chassis. Again a
nice sight!
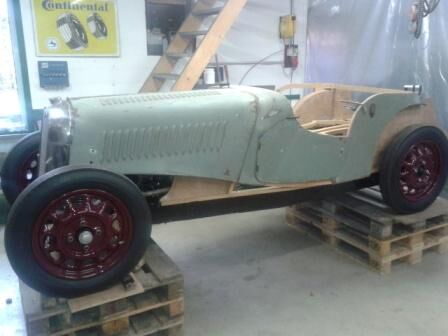
To satisfy my curiosity I took the old body panels from the loft, to
measure them on my car. It all seemed to fit in a normal way, until I
measured the distance between radiator shell and scuttle.
Great consternation, it seems to be 6 cm to long. The bonnet could
simply fall between the scuttle and radiator, an error on the skeleton? A bad
night followed...
But then I discovered that the radiator dont have to stand perfectly in
the upright position, as I placed it. In fact it is slightly tilted to the
bulkhead. So I moved it, and the second measurement from bonnet to scuttle gave
a complete different result. The distance was almost right now, and perfect as
a start position. So again I put the bonnet on. And now it fills nicely the
distance, and it follows perfectly the shape of the radiator shell. A heavy stone
fell off my shoulders...
Now I am looking for a safe way to remove the old paint from my original
body parts. Sandblasting is not an option, because of the deform that appears
on thin not strengthened parts. So I made contact with a firm that does paint
and rust removal with a chemical process. They are sure that there process fits
my requirements, and the parts are going there next week.
15-01-2013, 21:07
Geschreven door Jeff OdH 
|


