If
you set the identity impersonation to true, but do not specify a user
name and password, then the worker process attempts to access files as
the IUSR_machinename account.Now, specify a user name and password in the <identity> element, such as
In
this setup, it is true that the ASP.NET worker process still runs as
system, but when the worker process tries to access files on the server
(either in the virtual directory, or in the Temporary ASP.NET Files
directory for just-in-time compilation), it does so as the user
specified in the <identity> element, not as the system user.
As a result, it's necessary to allow this user to access the following folder (otherwise you will get Access Denied errors) :
C:WINDOWSMicrosoft.NETFrameworkv2.0.50727Temporary
ASP.NET Files
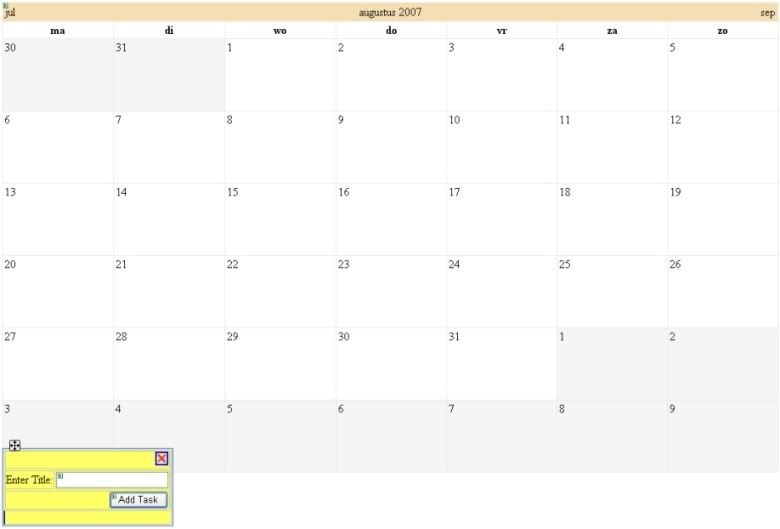
Most of the time a calendar is used to simply select a date, in some cases it will be stretched to give an overview of a schedule, getting the same look and feel as MS Outlook.
Now, what if you want to be able to add an event to a date ?
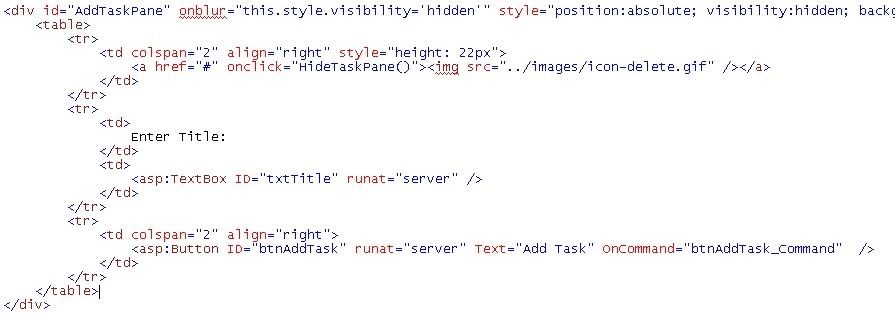
First drop a calendar control on your web user control or web page, be sure to stretch it in a similar way as below. Add a div containing one or more fields to insert info of the new events.
E.g.
Next step is to add 3 javascript functions : HideTaskPane ShowAddTaskPane ReceiveServerData
HideTaskPane will simply hide the div.
ShowAddTaskPane accepts 2 parameters, eventargs and the selected date. The function will display the task pane (the div) and call the server (by using a callback eventhandler, see later) to store the selecteddate, e.g. in the viewstate.
ReceiveServerData is called after the callback eventhandler, this can be used to display the data received from GetCallbackResult() (again, see later).
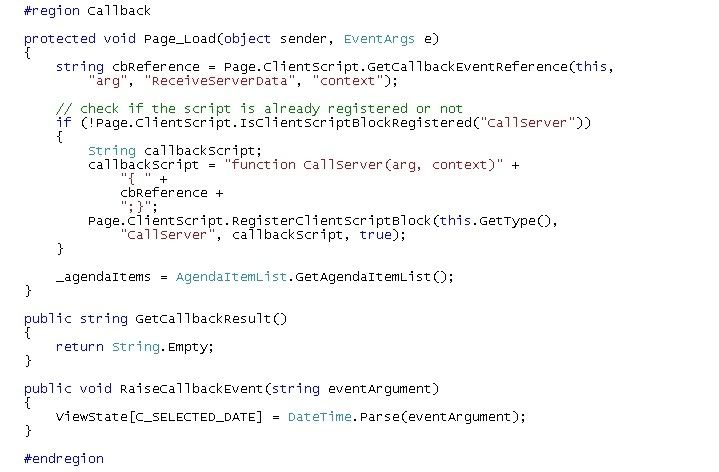
Now, moving to the C# (or VB.NET) code :
Dont forget to inherit from ICallBackEventHandler (in the System.Web.UI namespace).
In the Page_Load event, register the callback script if its not yet registered. The server-side RaiseCallBackEvent method is called from the client-side ShowAddTaskPane function, you can add the selected date to the viewstate and/or perform some other actions here. GetCallBackResult can be used for testing purpose (e.g. return the selected date from the viewstate) or to return data from the server to the client.
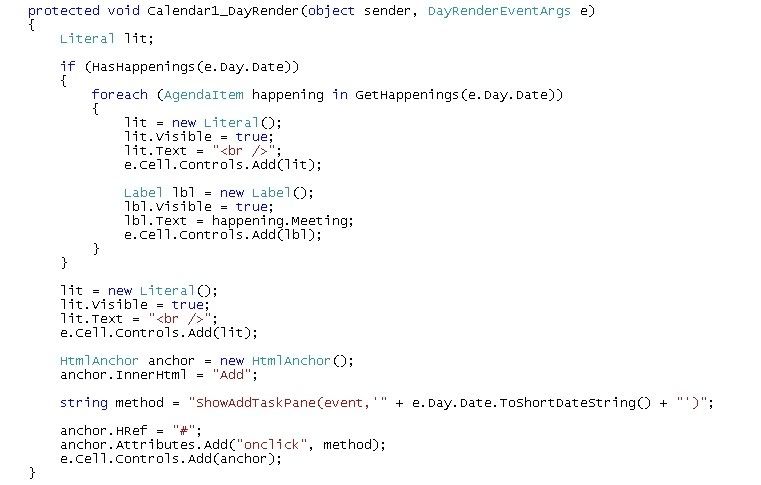
Last step is to add code in the DayRender event of the calendar. This is the place in which you can add controls to a day. This sample code will add events from a list of AgendaItems. Literals can be used to insert crlfs, labels to add existing events. An HtmlAnchor is used as a link to display the task pane, calling ShowAddTaskPane on click.
Web Parts are very useful to enable end users to modify the look and feel of your website : the content, appearance and even the behaviour can be changed, this is possible without writing any code.
First drag a WebPartManager control to the web page. This control must appear before any other Web Part control, otherwise a runtime exception will be thrown (and that's not exactly what we want...) Next add WebPartZone controls to the places where you want [an end user] to see Web Parts; you can do this inside a table to get a basic layout. The title can be changed in the HeaderText property. You can now start adding (in the design view) some web user controls to the WebPartZone controls by dragging and dropping.
A quick preview in a browser shows us the controls have a title "Untitled", this can easily be changed by adding title="" in the source code (the intellisense won't recognize it, don't worry about that) :
Now, all the above is quite useful, but to let the user interact with our web parts, a few things are still missing. Add an EditorZone and a CatalogZone the same way as the WebPartZone's above. Make sure not to add them to an existing WebPartZone as this will generate a runtime exception. In the EditorZone you can add an AppearanceEditorPart, LayoutEditorPart and BehaviorEditorPart, depending on what you want the end user to do. In the CatalogZone you can add a DeclarativeCatalogPart (when you want to add another instance of a predefined user control), a PageCatalogPart (to retain an existing control when you closed it) and an ImportCatalogPart (to import a non-defined user control).
When taking a quick look in the browser (after building...), you see none of the above appears... This is because the current view is set to the default view : Browse. Now let's add a control displaying the different modes, the first code that has to be written (except HTML...) ! (I chose a radiobuttonlist called rbListModes)
Make sure to set the AutoPostBack property of the control to "true" and start the application. When switching between the different display modes, you will be able to change properties and add/remove controls. To edit a control, switch to the Edit mode and click on in the right upper corner of the control and choose "Edit". The Editor parts added to the EditorZone will now become visible. To retain a closed control, switch to Catalog mode and navigate to Page Catalog, you will be able to display the control in the WebPartZone of your choice.
Error handling is one of the most important (and maybe least enjoying) things to do while developing.
Most of the times error-prone methods will contain try/catch blocks to prevent the exception from slipping through. There might still be some unhandled exceptions though, in code blocks not "protected" by a try/catch block. Those can be handled on page or on application level.
Now let's see an example, writing the error to the trace (so it can be viewed and further investigated by a developer using a trace listener) in case of page level error handling and navigating to a user defined error page in case of application level exception handling.
On page
level :
protectedvoid
Page_Error(object sender, EventArgs e) { // Retrieve the last error and write to the trace Trace.Write(Server.GetLastError()); // Clear the last error Server.ClearError(); }
On
application level :
void
Application_Error(object sender, EventArgs e) { // Navigate to a user defined error page Server.Transfer("HandleError.aspx"); // Make sure to call Server.GetLastError() and Server.ClearError() in the error handling page }
There are different ways to navigate to a different URL, including : Response.Redirect(url); Server.Transfer(url,
false);
What's the difference? With
Response.Redirect you will not be able to access data from the original page
through the PreviousPage property, by using Server.Transfer (or the PostBackUrl
property) you will be able to do so.
Ever wanted to return a comma seperated list of values with a query, struggling with functions or cursors ? In SQL 2005, there's an easy/short solution for this.
e.g. to return the name of a company and a comma separated list of e-mail addresses of the users in the company.
SELECT c.company_name, mail = STUFF ( ( SELECT , + u.mail_address as [text()] FROM t_User u INNER JOIN t_Company co ON u.company_id = co.company_id WHERE co.company_id = c.company_id FOR XML Path () ), 1, 2, ) FROM t_Company c
The STUFF() function removes - in this example - the first 2 characters in the list, to avoid starting the list with a comma followed by a space. Text() maps the list to a text node. For a description of "FOR XML Path", I refer to the MSDN documentation : http://msdn2.microsoft.com/en-us/library/ms345137.aspx
Some people keep asking me when I start blogging again. Yes again, since our first "blogging project" (used to be known as webbullogs) didn't last very long.
The purpose of this blog is to explain a bit what I'm busy with (mostly .NET related) - which will also allow me to remember some things a little longer ;-) - and some other useful (and at times extremely useless) stuff.
Hopefully you will enjoy reading it ... and maybe even learn something from it !
Neen, uw blog moet niet dagelijks worden bijgewerkt. Het is gewoon zoals je het zélf wenst. Indien je geen tijd hebt om dit dagelijks te doen, maar bvb. enkele keren per week, is dit ook goed. Het is op jouw eigen tempo, met andere woorden: vele keren per dag mag dus ook zeker en vast, 1 keer per week ook.
Er hangt geen echte verplichting aan de regelmaat. Enkel is het zo hoe regelmatiger je het blog bijwerkt, hoe meer je bezoekers zullen terugkomen en hoe meer bezoekers je krijgt uiteraard.
Het maken van een blog en het onderhouden is eenvoudig. Hier wordt uitgelegd hoe u dit dient te doen.
Als eerste dient u een blog aan te maken- dit kan sinds 2023 niet meer.
Op die pagina dient u enkele gegevens in te geven. Dit duurt nog geen minuut om dit in te geven. Druk vervolgens op "Volgende pagina".
Nu is uw blog bijna aangemaakt. Ga nu naar uw e-mail en wacht totdat u van Bloggen.be een e-mailtje heeft ontvangen. In dat e-mailtje dient u op het unieke internetadres te klikken.