Netwerkkabels zijn kant-en-klaar te koop, maar vaak slechts beschikbaar in enkele maten en bovendien erg duur. Goedkoper is het om zelf kabels te maken. We laten u zien hoe u te werk moet gaan.
Voor het maken van kabels dient u 'UTP Ethernetkabel' in huis te halen. UTP staat voor Unshielded Twisted Pair en wordt gebruikt voor een netwerk op basis van een ster-topologie: vanuit één plaats, zeg maar de centrale netwerkswitch, vertrekken meerdere UTP-kabels naar de verschillende vertrekken in uw huis.
Er bestaan verschillende categorieën UTP-kabels, waarbij vooral de kwaliteit en de ondersteunde snelheden een rol spelen. Zo is UTP van categorie 5 prima geschikt voor netwerksnelheden tot 100 Mbit/s. Wilt u sneller gaan, dan investeert u bij voorkeur in UTP-kabels van categorie 6. Daarmee zijn snelheden tot 1.000 Mbit/s mogelijk.
Let er op dat de totale afstand tussen twee netwerkapparaten in een Ethernet-netwerk nooit meer dan honderd meter mag bedragen. Houd de afstand dus zo kort mogelijk, vooral omdat langere kabels een negatieve invloed hebben op de snelheid. Kabels van minder dan een halve meter zijn echter evenmin aan te raden.
Stap 1: Materiaal verzamelen Voor we aan de slag kunnen gaan, hebben we enkele zaken nodig. Ten eerste: een speciale krimptang. Een dergelijke tang wordt gebruikt om de netwerkstekkers op de netwerkkabel te drukken. Koop een krimptang die overweg kan met RJ45-stekkers. Er bestaan namelijk ook tangen die speciaal bedoeld zijn voor telefoonkabels (type RJ11). Natuurlijk hebben we ook nog RJ45-stekkertjes nodig: twee per kabel.
Voor de aanschaf van netwerkkabel moet u vooral uitkijken naar aanbiedingen voor bulkhoeveelheden - die zijn nu eenmaal goedkoper. Meestal komen deze in de vorm van een grote kartonnen doos met enkele honderden meters netwerkkabel. De doorsnee computerwinkel zal zoiets echter niet in voorraad hebben. Een kijkje op de veilingen van eBay of Marktplaats kan hier van pas komen (zoek op de term 'UTP'): zo vonden wij op eBay driehonderd meter UTP-kabel (categorie 5) voor zestig euro.
Stap 2: knippen en strippen Knip met behulp van een scherp mesje of een schaar de netwerkkabel op de gewenste lengte. Verwijder vervolgens drie centimeter van de buitenste plasticlaag van de kabel. U kunt daarvoor een speciale striptang gebruiken, maar met een stanleymesje kan het ook. Als de kabel eenmaal gestript is, ziet u binnenin vier gekleurde draadparen. Trek de draadparen los, zodat er acht aparte en vrij te bewegen aders vrijkomen.
Stap 3: kleurvolgorde Voor een goed werkende netwerkkabel moeten de gekleurde aders in de juiste volgorde naast elkaar gezet worden. Er bestaan hiervoor twee kleurenstandaarden, EIA/TIA 568B en 568A. Voor datacommunicatie maakt het in principe niet uit welke u gebruikt, zolang u maar consequent dezelfde standaard hanteert.
Wij kiezen voor de 568A-standaard, en dat betekent van links naar rechts de kleuren groen/wit, groen, oranje/wit, blauw, blauw/wit, oranje, bruin/wit en bruin (klik op de afbeelding bij dit artikel voor een schema). Zorg ervoor dat de aders perfect naast elkaar liggen, zonder kronkels; duw er eventueel met uw duim op om alles mooi glad te krijgen. Is dit gelukt, knip dan de bovenkant van de aders recht af met een schaar, zodat u zo'n twee centimeter van de blootliggende aders overhoudt.
Stap 4: inschuiven en krimpen Nu schuiven we de gekleurde aders in de RJ45-stekker. Let op de oriëntatie van de stekker: zorg dat het lipje naar beneden is gericht. Schuif er nu heel voorzichtig de acht aders in en duw deze aan tot aan de kop van de RJ45-stekker.
Neem nu de krimptang. Plaats de RJ45-stekker in de krimptang en druk deze aan. Voorzie vervolgens het andere uiteinde van de kabel op exact dezelfde manier van een RJ45-stekker, en uw netwerkkabel is klaar voor gebruik.
APIs by Example: Retrieve Job Description Information API
Job descriptions play a very important role in work management on the i5. Whenever an interactive, batch, autostart, or prestart job begins its life, a number of significant job attributes are retrieved from the job description assigned to that job. As a consequence, job descriptions need to be carefully created, managed, and assigned, or unexpected and serious problems might be the outcome.
As programmers, we can help avoid these problems by writing utilities that make the system administrator's job easier. To write utilities that work with job descriptions, understanding the Retrieve Job Description Information (QWDRJOBD) API is helpful.
For example, if a library contained in the initial library list of a job description is deleted, and that job description is assigned to a user profile, the user profile in question can no longer sign on to the system but instead receives the error message "CPF1113 Library in initial library list not found." To help avoid such situations, and provide a working example of the QWDRJOBD API, I've written the Work with Referenced Job Descriptions (WRKREFJOBD) command.
The WRKREFJOBD lets you find and list all job descriptions referenced by specific objects on your system, before deleting or renaming these objects. From the resulting list panel, you then have various options to perform against the selected job descriptions, such as change, display, or delete the job description.
The WRKREFJOBD utility also provides yet another opportunity to demonstrate how powerful it is to combine list and retrieve APIs. In this example, I use the Open List of Objects (QGYOLOBJ) API to create a list of job descriptions and subsequently, for each returned qualified job description name, I use the QWDRJOBD API to retrieve the attributes of the job description. Using this information, I then evaluate the specified selection criteria and decide whether the job description should be included in the Work with list panel.
You can specify all combinations of job description and library special values to narrow your search to specific or generic job descriptions in various libraries. To list all job descriptions in library QSYS that have a user profile specified, run the following command:
WRKREFJOBD JOBD(QSYS/*ALL) USRPRF(*ANY)
You also have an option to define the relationship between multiple selection criteria. If you specify an OR relationship, all job descriptions meeting just one of the criteria are included in the list. Specifying an AND relationship includes only the job descriptions meeting all the specified criteria.
The preceding command leads to the display of the following list panel (optionally, you can have the list printed instead):
The list panel offers three alternate views, all in all displaying each job description's user, print device, initial library list flag, partial request data, job and output queue as well as text description. Cursor-sensitive help text is provided for the list panel and the command to explain all details.
In case you are wondering how job descriptions are assigned to the different job types that I've mentioned, here's a brief overview:
Interactive jobs pick up the job description from the work station entry that they are signing on through. By the default special value *USRPRF, the work station entry points to the signing-on user profile's job description, as you can see on the partial command prompt of the Add Workstation Entry (ADDWSE) command:
                   Add Work Station Entry (ADDWSE)

 Type choices, press Enter.

 Subsystem description  . .               Name
   Library  . . . . . . . .     *LIBL     Name, *LIBL, *CURLIB
 Work station name  . . . .               Name, generic*
 Work station type  . . . .               *ALL, 3179, 3180, 3196...
 Job description  . . . . .   *USRPRF     Name, *USRPRF, *SBSD
   Library  . . . . . . . .               Name, *LIBL, *CURLIB
To inspect how your system is set up, run the Display Subsystem Description (DSPSBSD) command against your interactive subsystem and select option 4 (Work station name entries) and 5 (Work station type entries). From each resulting panel, you can specify option 5 for the entry that you want to display.
Batch jobs rely on the Submit Job (SBMJOB) command's job description (JOBD) parameter to locate the job description under which the job should run. By default, this parameter also points to the special value *USRPRF. In this context, *USRPRF refers to the user profile specified on the SBMJOB command's user (USER) parameter, which by the default value *CURRENT points to the user profile running the SBMJOB command. So if the default values are used for these two parameters, the submitting user profile is the origin of the job description for the submitted batch job.
For prestart jobs and autostart jobs, the job description is named directly on the Add Prestart Job Entry (ADDPJE) and Add Autostart Job Entry (ADDAJE) commands, respectively. In both cases, special values can also be used to define the job description parameter. Diving deeper into i5/OS work management is beyond this article's scope, but I have collected a number of links providing useful information for learning more about this topic:
This APIs by Example includes the following sources:
CBX161   -- Work with Referenced Job Descriptions - CCP
CBX161E  -- Work with Referenced Job Descriptions - UIM Exit
CBX161H  -- Work with Referenced Job Descriptions - Help
CBX161P  -- Work with Referenced Job Descriptions - Panel Group
CBX161X  -- Work with Referenced Job Descriptions

CBX161M  -- Work with Referenced Job Descriptions - Build Command
To create all these objects, compile and run CBX161M. Compilation instructions are in the source headers, as usual.
Q: I'm new to ILE, and I'm not sure whether I bound my program to a *MODULE or to a *SRVPGM. How can I find out how it was bound to verify that I did it correctly?
A: Whenever you're new to something, it's always good to have a way to check the results of what you did, to ensure that it all worked the way you expected it to. ILE is no different.
The Display Program (DSPPGM) command tells you which modules were copied into your program, as well as which service programs your program references. For example:
DSPPGM PGM(mylib/mypgm)
The first screen is helpful for checking that your program has the correct activation group, as well as adopted authority settings, and so forth. It looks like this:
These are the modules that you listed in the MODULE keyword of the Create Program (CRTPGM) command, or that were included as *MODULE type entries in a binding directory. If you used a binding directory, only the modules actually used are listed here.
If you like, you can key the number 5 next to each module to view more information about it. This option tells you the source file and member from which the module was created, the date and time that source member was last modified, and lots of other stuff.
When you're done viewing the details of the module(s), you're returned to the screen where it listed them. If you hit the Enter key once again, you see the service programs referenced. Here's what that screen looks like:
                          Display Program Information
                                                                 Display 4 of 7
 Program  . . . . . . . :   MYPGM         Library  . . . . . . . :   MYLIB
 Owner  . . . . . . . . :   GOODGUYS
 Program attribute  . . :   RPGLE
 Detail . . . . . . . . :   *SRVPGM


 Type options, press Enter.
   5=Display

      Service
 Opt  Program     Library     Signature
      QRNXIE      QSYS        D8D9D5E7C9C540404040404040404040
      QRNXUTIL    QSYS        D8D9D5E7E4E3C9D34040404040404040
      QLEAWI      QSYS        44F70FABA08585397BDF0CF195F82EC1
      UTILR4      *LIBL       E4E3C9D3D9F4E2E3C1E3C9C340404040


                                                                         Bottom
 F3=Exit   F4=Prompt   F11=Display character signature   F12=Cancel   F17=Top
 F18=Bottom
The first three service programs listed (the ones in library QSYS) are automatically bound to all ILE RPG programs. I didn't have to specify them in a binding directory or on the CRTPGM statement. They're always included automatically because they contain routines that the RPG runtime environment needs to run an RPG program.
The last one (UTILR4) is one of my own service programs. Because I found it here in the service programs section and not on the modules screen, I know that I'm calling the service program's routines instead of calling its modules directly. That's important, because I don't want to have to rebind all my programs if I make a change to the UTILR4 service program.
The DSPPGM command makes verifying that you created your *PGM object with the right parameters easy. When you want to check a *SRVPGM object to see which modules or other service programs it references, you can use the Display Service Program (DSPSRVPGM) command. It works almost exactly the same as DSPPGM, except that it shows the details of a *SRVPGM object instead of a *PGM object.
When you want to control how long journal receivers are available online, you will want to "age" the receivers. For example, if you want to keep five days' worth of transactions online, you can either manually delete the old receivers or run the command presented this month.
The Remove Journal Receivers (RMVJRNRCV) command lets you age the receivers and optionally connect the journal to a new receiver.
You can run this command against all your journals, including QAUDJRN, to perform an intelligent deletion of old receivers.
The command performs a clean-up process against the specified journal's receiver directory. You can specify the number of journal receivers to retain, the number of days (since detachment), or a combination of both. The force parameter controls whether the journal receivers should be saved to be eligible for deletion and, for remote journals, whether replication should occur. Optionally, you can have the CHGJRN command run to change the journal receiver (before directory clean up). I've also included the Sequence option so you can ensure that the journal entry numbering is continued, regardless of the current default value of the CHGJRN command.
For more details about command parameters and command usage, refer to the help panel group.
The following source code is included. As always, check the source code headers for compile instructions and additional documentation.
Journals are used by i5/OS for many purposes, such as
recording before and after images of database record inserts, changes, and deletions
recording security-related events like authority failures, invalid sign-ons, changes to system values, and deletion of objects
recording user-defined events
If you are curious about how many journals exist on your system, you can run the command WRKJRN *ALL/*ALL. There are a multitude of journals; most are used for recording database changes. IBM supplies many of the journals, and others are user created. One of the issues that you run into with journals is that the associated journal receivers can often require significant disk space. The journal receiver is actually the storage area for the data collected through the journal.
How Big Are My Journal Receivers?
To display all your current journal receivers and to get a listing of the size of each receiver, you can use the following command:
Or you can choose the OUTFILE option and place the output in a database file. You can then use a query tool to list the receiver name (ODOBNM), the library name (ODLBNM), and the receiver size in bytes (ODOBSZ). I think if you add up the size of all your journal receivers, you'll be surprised at the amount of disk space used to hold all journaled data. Some of you will be appalled.
You will want to delete the journal receivers that are no longer needed. To identify those that are not needed, look at the detach date and whether the receiver has been saved. You determine how many days of receiver data you need by considering your requirements for reporting, freeing disk space, and forensic research on the receiver data.
How to Call an API Without Worrying About the 64 KB Limit
Q: I want to return information about the indices built over a physical file. I'm using the Retrieve Member Description (QUSRMBRD) API to do that. One of our files has more than 70 logical files built over it, and each index needs 2,176 bytes of space. If my math is correct, that means I need 217,600 bytes! Is there a good way of overcoming RPG's 64 KB limitation? In the future, I want to be ready to handle even more indices, should they be needed!
A: The QUSRMBRD API, like many APIs, can tell you how much space it needs to return all its results. Rather than use a variable whose size must be known at compile-time, I suggest using dynamic memory allocation. That way, you can ask the API how much space it needs and then tell the operating system that you need exactly that much memory. Using this technique, you won't have to worry about RPG's 64 KB limitation.
The QUSRMBRD API when called with format MBRD0400 returns an array of information about the indices of a file. At the start of MBRD0400, there's information about how much space the API needs to return a complete array. The start of the format looks like this:
     D MBRD0400        ds                  qualified
     D                                     based(p_RcvVar)
     D   BytesRtn                    10I 0
     D   BytesAvail                  10I 0
     D   Count                       10I 0
     D   Offset                      10I 0
As you can see, I based this data structure on a pointer. I ask the system to allocate enough memory to store this minimal data structure, and I pass that to the API. Of course, the API can't fit any indices in the preceding data structure, but it fills in the BytesAvail variable, and that variable tells me how much memory I need if I want the whole thing.
The first time through the loop, nothing has yet been allocated to p_RcvVar, so it is set to *NULL. When this happens, I use the %ALLOC built-in function (BIF) to ask the operating system for enough memory for the minimal data structure.
The second time through the loop, I release the memory that the operating system previously provided, and I ask for enough memory to get everything the API has to offer and call the API again.
In almost all cases, the program runs through the loop only twice. If someone manages to add a new index between the time I call %ALLOC and the time I call the API, I end up looping a third time to expand the memory again. In the end, though, I get the whole thing.
After you do that, you can use the same pointer logic that you typically use with offsets provided by APIs to loop through the returned data and do something with it. For example:
     D InxDS           DS                  Based(p_InxDS)
     D                                     qualified
     D   LibNam                     258A   Varying
     D   FilNam                     258A   Varying
     D   MbrNam                     258A   Varying
     D   CstTyp                      11A
     D                                9A
     D   InxVld                       1A
     D   InxHld                       1A
     D                                6A
     D   CrtDTM                      14A
     D   RBldDTM                     14A
     D   UseDTM                      14A
     D   SttDTM                      14A
     D   UseCnt                      20I 0
     D   SttCnt                      20I 0
     D   Stt2Cnt                     20I 0
     D   Keys                        20I 0
     D   Size                        20I 0
     D   Key1Unq                     20I 0
     D   Key2Unq                     20I 0
     D   Key3Unq                     20I 0
     D   Key4Unq                     20I 0
     D   RBldSec                     10I 0
     D   DlyKeys                     10I 0
     D   OvFlCnt                     10I 0
     D   CdeSiz                      10I 0
     D   LFRdRqs                     20I 0
     D   PFRdRqs                     20I 0
     D                               56A
     D   Sparse                       1A
     D   DrvKey                       1A
     D   Partnd                       1A
     D   Maint                        1A
     D   Recvry                       1A
     D   Type                         1A
     D   Unique                       1A
     D   SrtSeq                       1A
     D   SrtLib                      10A
     D   SrtNam                      10A
     D   SrtLang                      3A
     D   SrtWgt                       1A
     D   PagSiz                      10I 0
     D   KeyLen                      10I 0
     D   KeyCnt                      10I 0
     D                               82A
     D   KeyLst                    1024A   Varying
          .
          .
          for ix = 1 to MBRD0400.Count;
              p_InxDS = p_RcvVar + MBRD0400.Offset +
                        (ix-1) * %size(InxDS);

              // do something with the data in the InxDS
              // data structure here.

          endfor;

          dealloc p_RcvVar;
Don't forget to use the DEALLOC opcode at the end of the program to return the allocated memory to the system. (If you forget, it won't be released until the activation group ends.)
Q: I'm writing an RPG program that has a numeric field defined as "5P 2". If it contains a value such as 3.00, I want to move it to a character field and display it without trailing zeroes. However, if the decimal has a value such as 3.01, I want to display it as is. How can I do this?
A: There isn't an edit code or edit word that strips trailing zeroes, so you have to write a bit of program logic.
The basic premise of this code is to check the variable to see whether anything is in the decimal places. If it is, move them to the numeric field. If not, strip them before you move them. The following code works in V5R1 or later:
     D mynum           s              5  2
     D char            s              7A
           .
           .
           if %dec(mynum:3:0) = mynum;
              char = %char(%dec(mynum:3:0));
           else;
              char = %char(mynum);
           endif;
The %DEC() built-in function (BIF) is used to convert the number to a 3,0. In other words, it's the same field, but without the two decimal places. If it still has the same value after the decimal places have been stripped, you know that those decimal places were zero. Therefore, you can format this 3,0 field into the character variable.
If stripping the decimal places causes the value to be different, then a value must've been in those decimal places, so they're kept in when formatting the string
Q: I need to write a CL program that processes the contents of an IFS directory. I need it to allow wildcards, both that exist and that don't exist. For example, I want to process *.csv in the directory. For all files that end in csv (and match the pattern), I want to copy them to database files and move them to a different place in the IFS. For those that don't end in csv, I want to move them to a different place in the IFS. The wildcard pattern can be different on each call to my program. How can I do that in CL?
A: In the May 19, 2005, issue of this newsletter, I provided some CL commands that you can use to read the contents of an IFS directory. After these commands are installed on your system, you can read a directory as easily from CL as you can from any other language.
In this article, I enhance those commands to meet your needs. I provide the source code for the CL commands and a service program that enables the same support from RPG, and I demonstrate how to use them.
The original article from the May 19, 2005, issue of this newsletter let you pass a regular expression when opening a directory. A regular expression is a pattern-matching scheme, similar to the wildcard in your example but more powerful.
The problem with the original article is that it provides only the file names that match the regular expression, and not those that don't match. I've extended the utility by adding parameters to "reverse" the regular expression. When you tell the utility to reverse the regular expression, instead of returning only the files that match, the utility returns only those that don't match.
For example, here's a CL program that uses my commands to read all the files in the /data/dir directory that end in CSV:
For the sake of demonstration, I use the SNDPGMMSG command to print the file name of each file as a *DIAG message that you can view in your job log.
Notice that I provide a regular expression of CSV$ to the OPENDIR command. The $ character means that the pattern is matched only at the end of each file name, so this finds all files that end in CSV. The regular expression matching that OPENDIR uses is case-insensitive, so this matches files that end in CSV, Csv, csv, and any other combination of upper case and lower case that you can think of.
There's also a REWINDDIR command in my utility. When you run that command, it moves back to the start of the directory list and lets you read it again. This new revision of the utility adds a REVERSE parameter to the REWINDDIR command. If you tell it to reverse, when you read the directory again, it gives you the files that don't match the regular expression instead of the ones that do.
Here's another example. This time, I read the directory list twice: The first time, I retrieve all the files that end in CSV, and the second time, I retrieve all those that do not:
In the preceding sample, the code first reads every file that matches the pattern CSV$, just as the previous example did. After it has finished reading through the directory the first time, it uses the REWINDDIR command (in red) to tell the system to read the directory again. This time, however, it specifies REVERSE(*YES), which tells it to retrieve the opposite files (i.e., those that do NOT match CSV$), so I get everything that doesn't end in CSV.
In blue, I put the code that prints the file names to the job log. In your program, you need to replace this blue code with the code that moves your files to the appropriate directories. In the first section, you process CSV files, so you need to move your files to the correct directory for CSV processing and copy them to database files. In the second section, they are non-CSV files, so you need to move them to the alternate directory.
Under the covers, these commands work by calling subprocedures in an ILE RPG service program. If you're not an RPG programmer, rest assured that after you compile this utility on your system, you won't need to know anything about the RPG code. You can use the CL command wrappers that I demonstrated earlier from your ILE and OPM CL programs.
However, if you need the same sort of support from RPG, you might find calling the subprocedures directly handy. For example, here's a program written in RPG and very similar to the preceding CL programs:
     H DFTACTGRP(*NO) BNDDIR('IFSDIR')

      /copy ifsdir_h

     D d               s             10I 0
     D file            s            640A
     D msg             s             52A

      /free

         *inlr = *on;

         d = IFS_opendir('/data/dir': 'CSV$');
         if (d < 0);
            msg = IFS_error();
            dsply msg;
            return;
         endif;

         dsply '   ** ending in CSV **';

         dow (IFS_readdir(d: file) > 0);
            msg = file;
            dsply msg;
         enddo;

         dsply '   ** not ending in CSV **';
         IFS_rewinddir(d: *ON);

         dow (IFS_readdir(d: file) > 0);
            msg = file;
            dsply msg;
         enddo;

         IFS_closedir(d);
         return;

      /end-free
To build the utility, I provide a CL program called BUILD that's also included in the code download. There's also a readme.txt file that contains further instructions about how to build the utility.
The CL commands in this utility are based on the ones that I demonstrated in the May 19, 2005, issue of this newsletter. You can read that article at the following link: http://www.iseriesnetwork.com/article.cfm?id=50930
The RPG code in this utility is based on code demonstrated in the May 12, 2005, issue of this newsletter. You can read that article at the following link: http://www.iseriesnetwork.com/article.cfm?id=50900
I'm frequently asked how to translate data from EBCDIC to ASCII, or EBCDIC to Unicode, or between the character sets used by different cultures. In most cases, the best solution to these translations is the iconv() API.
The key to using iconv() on the iSeries is knowing which Coded Character Set Identifiers (CCSIDs) you need to translate between. A CCSID is a number that identifies a character set that has been encoded a particular way. For example, to identify the character set used in the U.S. when encoded in single-byte EBCDIC, we can refer to CCSID 37. The number 37 is just an identifying number that IBM assigns to that particular character set when it's encoded as EBCDIC so that when the time comes to translate to or from U.S. EBCDIC, all we need to specify is 37 for the CCSID parameter.
To get started with iconv(), you have to open a "conversion descriptor." That's a technical way of saying that the system needs to find the right translation table and reserve some memory for work variables that it uses internally. To do that, you pass the CCSIDs to the QtqIconvOpen() API. It takes care of finding the right table, loading it into memory for quick access, and reserving memory for the internal work variables. Here's an example of opening a conversion descriptor:
      /copy iconv_h

     D from            ds                  likeds(QtqCode_T)
     D                                     inz(*LIKEDS)
     D to              ds                  likeds(QtqCode_T)
     D                                     inz(*LIKEDS)
     D table           ds                  likeds(iconv_t)

      /free

         from.CCSID  = 37;
         to.CCSID    = 819;

         table = QtqIconvOpen(to: from);
         if (table.return_value = -1);
             errMsg = 'Unable to load translation table';
             // FIXME: show message to user.
             *inlr = *on;
             return;
         endif;
To make calling iconv() as simple as possible, I put all the definitions that I need in the ICONV_H source member, and I use the /COPY directive to bring those definitions into each program that uses iconv(). In the preceding code, "from" and "to" are copies of a data structure stored in the ICONV_H member. The only field in that data structure that I need to change is the CCSID field, so that I can tell the API which CCSIDs to convert between. I pass the data structures containing these CCSIDs to QtqIconvOpen(), and it finds the table, reserves memory for work variables, and returns a conversion descriptor. The descriptor is actually a data structure also defined in ICONV_H. It contains a subfield called return_value, and I can check that subfield to verify that QtqIconvOpen() completed successfully.
Now that I have the translation table loaded, I can pass it to the iconv() API to translate some data. The prototype for the iconv() API is defined in ICONV_H as well. This is what the prototype looks like:
     d iconv           PR            10I 0 extproc('iconv')
     d   cd                                like(iconv_t) value
     d   inbuf                         *
     d   inbytesleft                 10U 0
     d   outbuf                        *
     d   outbytesleft                10U 0
The first parameter to iconv() is the conversion descriptor. The remaining parameters are a pointer to the next character to convert, the number of characters left to convert, a pointer to the memory where the translated character should be stored, and the amount of memory that remains for converted characters.
Iconv() reads your input data one character at a time and converts it to an output character. After that character is translated, it changes the pointers to point to the next character to be translated and decreases the bytes left for the input and output buffers. It continues doing this in a loop (converting each character and updating the parameters) until it runs out of characters to translate, runs out of space in the output buffer, or finds a character that it can't translate.
Because the pointers and space left fields are updated as iconv() runs, if an error occurs, you can call iconv() back, and it picks up where it left off.
Here's an example of translating a string from EBCDIC to ASCII using the conversion descriptor from the preceding code snippet:
     D p_input         s               *
     D inleft          s             10U 0
     D p_output        s               *
     D outleft         s             10U 0

     D input_data1     s             50A
     D output_data1    s            200A
         .
         .
         input_data1  = 'Hello, my name is Scott';
         output_data1 = *blanks;

         p_input = %addr(input_data1);
         inleft  = %len(input_data1);

         p_output = %addr(output_data1);
         outleft  = %size(output_data1);

         iconv( table
              : p_input
              : inleft
              : p_output
              : outleft );
In the preceding code snippet, I start by pointing the input and output pointers to variables in my program. I set up the "bytes left" fields to be the length of the data to translate and the amount of memory to receive the results. I then call iconv() to perform the translation.
Translating data stored in a VARYING string is a little more complicated because the API doesn't know anything about VARYING. You see, VARYING is an RPG concept in which a character string is prefixed by a two-byte field containing the length of the string. Because the API is unfamiliar with VARYING, we can skip those two bytes (by adding two to the pointer), and it translates the character data without even knowing that the string is VARYING. Here's an example of using iconv() with a VARYING string:
     D input_data2     s             50A   varying
     D output_data2    s            200A   varying
         .
         .
         input_data2 = 'Goodbye, it was nice meeting you!';
         %len(output_data2) = %size(output_data2) - 2;

         p_input = %addr(input_data2) + 2;
         inleft  = %len(input_data2);

         p_output = %addr(output_data2) + 2;
         outleft  = %len(output_data2);

         iconv( table
              : p_input
              : inleft
              : p_output
              : outleft );

         %len(output_data2) = %len(output_data2) - outleft;
Because a pointer points to a particular byte in memory, adding two to that pointer points two bytes later in memory. Therefore, it effectively skips over the length that's prefixed to the VARYING fields.
Because the output variable is also VARYING, I set its length to the maximum length that can be stored in the field before the conversion. After the conversion is complete, I use the "bytets left" field to determine how much data was actually placed in the output field, and I adjust the length accordingly.
You can use the same conversion descriptor to translate as many strings as you like. When you're done converting data with iconv(), you should call the iconv_close() API. This lets the system free up the memory for its internal work variables so that the memory is available for other tasks.
Here's an example of calling iconv_close():
iconv_close(table);
Instead of specifying a CCSID when you call QtqIconvOpen(), you can specify a special value of zero. If you specify zero, it tells iconv() that you'd like to use the default CCSID for the current job. For example, instead of hard-coding 37 for the EBCDIC CCSID of my data in the previous examples, I could've specified zero as follows:
      /copy iconv_h

     D from            ds                  likeds(QtqCode_T)
     D                                     inz(*LIKEDS)
     D to              ds                  likeds(QtqCode_T)
     D                                     inz(*LIKEDS)
     D table           ds                  likeds(iconv_t)

      /free

         from.CCSID  = 0;
         to.CCSID    = 819;

         table = QtqIconvOpen(to: from);
         if (table.return_value = -1);
             errMsg = 'Unable to load translation table';
             // FIXME: show message to user.
             *inlr = *on;
             return;
         endif;
Using the job's default CCSID is especially useful when the data that you translate is data that the user keyed in. It saves you the effort of trying to figure out what CCSID the user's data will be. Assuming that the job's CCSID was set up properly, it'll be the correct one for the data that the user types.
You'll find IBM's documentation for iconv() and related APIs in the Information Center. These APIs are part of the Code Conversion subcategory of the National Language Support APIs category. Here's a link to that section of the Information Center: http://publib.boulder.ibm.com/infocenter/iseries/v5r3/topic/apis/nls3.htm
* SqlSTATE Codes D StateSucces C Const('00000') D StateWarning C Const('00001') D StateNoData C Const('00002') D StateRowNotFnd C Const('00100') D StateNoRow C Const('02000') D StateDupKey C Const('23505')
// A error occured in the write/update/delete operation ? If SqlStt <> StateSucces and SqlStt <> StateNoRow; Exsr *Pssr; Endif;
Endsr; // CheckSqlState
/End-Free
// ============================================================ // Procedure : Update creation order number in OR file. // ============================================================ P UpdateOrOrdn B
* Procedure Interface D UpdateOrOrdn Pi
C/EXEC SQL C+ Update OR C+ Set OrOrdn = OrOrdn + 1000000000, C+ OrLsad = :P_DatPf, C+ OrLsai = :#Pgm C+ Where OrOrdn > 0 and OrOrdn < 1000000000 C/END-EXEC
P UpdateOrOrdn E
// =========================================================== // Procedure : Update creation order number in GC file. // =========================================================== P UpdateGcCorn B
* Procedure Interface D UpdateGcCorn Pi
C/EXEC SQL C+ Update GC C+ Set GcCorn = GcCorn + 1000000000, C+ GcLsad = :P_DatPf, C+ GcLsai = :#Pgm C+ Where GcCorn > 0 and GcCorn < 1000000000 C/END-EXEC
Q: My company has decided to start using subprocedures instead of subroutines so that we can use ILE concepts to improve our applications. In my programs, I like to have a subroutine like the following one:
     C     EndPgm        begsr
      *  Do any additional cleanup here
     C                   close     *ALL
     c                   eval      *INLR = *ON
     C                   return
     C                   endsr
The advantage of this code is that I can end my program from anywhere just by calling the subroutine. I can put cleanup code in the subroutine, and I know it'll always be run. If I convert this subroutine to a subprocedure, it doesn't end the program! If I leave it as a subroutine, I can't call it from subprocedures! What's a poor RPG programmer to do?
A: First, let me explain why your subroutine works and a corresponding subprocedure doesn't. Consider the following sample program:
The loop is executed only once, because the EndNow subroutine ends the program. How does it do that? It turns on the *INLR indicator, but that doesn't end the program. *INLR is just a variable. There's a point in the RPG cycle at which there's code (generated by the compiler) that checks *INLR to see if it's on, and if it is, it closes the files, resets the variables, and ends the program.
The RETURN opcode ends the procedure that you run it from and returns control to its caller.
Let me clarify what I mean by procedure: In ILE languages, including RPG IV, all the code in your program is in a procedure. It's either in the main procedure (which is the case in this example), or it's in a subprocedure. The part of the program that we wrote all our code in before subprocedures were introduced is the "main" procedure. The main procedure is the mainline of your program and is the part that's always been around, even in the RPG II and RPG III days. Everything not in a subprocedure is in the main procedure.
When the RETURN opcode is executed in this case, it ends the main procedure and returns control to its caller. When the RETURN opcode is run from the main procedure, it also checks *INLR and, if it's on, closes the files, resets the variables, and does all the other stuff that you expect *INLR to do. In this example, the main procedure's caller is the command line, so the user gets control and can run commands or do whatever he or she wants to do next.
On the other hand, consider the following code:
      *  Compile with:
      *     CRTBNDRPG PGM(ENDTEST2) SRCFILE(xxx/xxx)
     H DFTACTGRP(*NO)
     D EndNow          PR

      /free
           dow '1';
              dsply 'loop';
               EndNow();
           enddo;
      /end-free

     P EndNow          B
     D EndNow          PI
      /free
         *inlr = *on;
         return;
      /end-free
     P                 E
In this case, the RETURN opcode isn't run from the main procedure. It's run from a subprocedure. When the subprocedure ends, it returns control to its caller. Its caller is the main procedure, which continues looping!
The preceding example does set *INLR on, so if it were to reach the point in the RPG cycle where the *INLR indicator is set, it would end, but in this case, it doesn't. Another way to make it end would be to run the RETURN opcode from the main procedure. For example, the following code would end:
      *  Compile with:
      *     CRTBNDRPG PGM(ENDTEST3) SRCFILE(xxx/xxx)
     H DFTACTGRP(*NO)
     D EndNow          PR             1N

      /free
           dow '1';
              dsply 'loop';
              if EndNow();
                return;
              endif;
           enddo;
      /end-free

     P EndNow          B
     D EndNow          PI             1N
      /free
         *inlr = *on;
         return *ON;
      /end-free
     P                 E
I recommend the preceding coding style for most subprocedures that want to end the program. Why? Because it makes the subprocedures more reusable. The next program that wants to reuse the same subprocedure might not want the subprocedure to end the program. This way, it's up to the caller whether the program ends or not.
However, there are situations in which you definitely want the program to end when a subprocedure is called, and you don't want to have to have each subprocedure in the call stack check the result of the previous subprocedure and execute RETURN, which could become very cumbersome.
Unfortunately, in the ILE model, the call stack is not arranged by program. Subprocedures in one program can call subprocedures in another module, program, or service program directly. Consider this call stack:
Program1_MainProc is the main procedure for a program named Program1. It's called from the command line. It calls a subprocedure in the same program named SubProc1. Subproc1 calls a procedure named SubProc14 in a service program named SrvPgm2, and so on.
It might make sense for Program1_SubProc1 to end Program1. But, would it make sense for SrvPgm2_SubProc12 to end SrvPgm2? Should it end SrvPgm3_SubProc8, even though it's not in the same program? Should it completely end SrvPgm3? If it goes down the call stack ending procedures, how should it know where to stop?
My point is this: You have to think about ending a program a little bit differently in ILE (or any other modular programming environment) than you would in the old days, because of the ability to call subprocedures across module and program boundaries.
This is one of the reasons that IBM created activation groups. You can group things that belong to a given "program" or "application" and end them all together.
For example, you could use the Normal End (CEETREC) API to end everything from your "global cleanup" subprocedure.
      *  Compile with:
      *     CRTBNDRPG PGM(ENDTEST4) SRCFILE(xxx/xxx)
     H DFTACTGRP(*NO)
     D EndNow          PR

      /free

           dow '1';
              dsply 'loop';
              EndNow();
           enddo;

      /end-free

     P EndNow          B
     D EndNow          PI

     D CEETREC         PR
     D   rc                          10I 0 const options(*omit)
     D   user_rc                     10I 0 const options(*omit)

      /free
         *inlr = *on;
         CEETREC(*omit: 0);
      /end-free
     P                 E
The CEETREC API finds out which activation group it was called from. It then walks up the call stack and ends every subprocedure in the same activation group. CEETREC stops when it finds a call stack entry in a different activation group, or when it finds a non-ILE program.
If CEETREC has ended all the call stack entries in the activation group, it also reclaims the activation group itself.
To say it another way: CEETREC ends your program or service program. If your program or service program was called from another ILE program in the same activation group, CEETREC ends that one, too.
If the name CEETREC seems a little arcane, there's also the exit() function from ILE C. It does the same thing as CEETREC, but it has a friendly sounding name:
      *  Compile with:
      *     CRTBNDRPG PGM(ENDTEST5) SRCFILE(xxx/xxx)
     H DFTACTGRP(*NO) BNDDIR('QC2LE')
     D EndNow          PR

      /free

           dow '1';
              dsply 'loop';
              EndNow();
           enddo;

      /end-free

     P EndNow          B
     D EndNow          PI

     D exit            PR                  extproc('exit')
     D   status                      10I 0 value

      /free
         *inlr = *on;
         exit(0);
      /end-free
     P                 E
The number that you pass to the exit() and CEETREC() APIs is an "exit status code." In QShell, you can check this code in your shell scripts. By convention, it should be set to zero when the program ends normally, or a number from 1 to 255 if the program ends abnormally. As far as I know, this number isn't used by the operating system at all, and it is useful only from QShell scripts.
Finally, one other approach to having a global cleanup routine is to register a cleanup subprocedure that's called automatically when the activation group ends. That way, you don't need a special EndNow() subprocedure. Just end the activation group when you're done with your program, and the cleanup routine is called automatically.
The Register Activation Group Exit Procedure (CEE4RAGE) API lets you configure the ILE environment to call your subprocedure when the activation group ends. Here's an example of that:
      *  Compile with:
      *     CRTBNDRPG PGM(ENDTEST6) SRCFILE(xxx/xxx)
     H DFTACTGRP(*NO)

     D EndNow          PR

     D my_cleanup      PR
     D   AgMark                      10U 0 const
     D   Reason                      10U 0 const
     D   Result                      10U 0
     D   UserRc                      10U 0

     D CEETREC         PR
     D   rc                          10I 0 const options(*omit)
     D   user_rc                     10I 0 const options(*omit)

     D CEE4RAGE        PR
     D   procedure                     *   procptr const
     D   feedback                    12A   options(*omit)

      /free

          CEE4RAGE(%paddr(my_cleanup): *OMIT);

      ...  regular program code goes here ...

          CEETREC();

      /end-free

     P my_cleanup      B
     D my_cleanup      PI
     D   AgMark                      10U 0 const
     D   Reason                      10U 0 const
     D   Result                      10U 0
     D   UserRc                      10U 0
      /free
         // do special cleanup here.
         *INLR = *ON;
         dsply 'my_cleanup called!';
      /end-free
     P                 E
The advantage of this technique is that any procedure in the activation group can call CEETREC when it's done processing, and the my_cleanup() subprocedure is called automatically. The subprocedures don't need to know about my_cleanup(), or even that it exists; they just need to end the activation group, and my_cleanup() is called automatically.
One benefit of this technique is that the my_cleanup() subprocedure is still called, even if the program crashes and the operating system ends the activation group for you.
A trigger program is just like any other program with a few restrictions on what it can do. In part 1 we discussed one of these restrictions: the trigger program's parameter list. Since the system will be calling the trigger program, it's parameter list must be strictly coded. Once a trigger program has been successful called, it can do almost anything a non-trigger program can. In this installment, we'll discuss in detail the other things trigger programs must not and/or should not do.
Reviewing the trigger categories
When discussing the restrictions placed on trigger programs, it is important to remember the six types of triggers. The differences among them have to do with why and when they are called. Three record I/O events cause triggers to be called -- deletion, insertion, and update. In addition, a trigger can be configured so it is called either before or after the database carries out the I/O event. This produces the following six possible combinations:
1. Before delete
2. After delete
3. Before insert
4. After insert
5. Before update
6. After update
Also recall that the same trigger program can be attached to multiple files and/or to the same file multiple times as different types of triggers.
Four issues regarding trigger inter-operability with i5/OS functions
Some i5/OS (OS/400) commands affecting physical files may not work as designed when triggers are involved. Here are a few of the more common situations:
1. When an attempt is made to clear -- either directly or indirectly -- a member of a physical file that has a delete trigger attached to it, the operation will fail with escape message CPF3157. An example of a direct clear-member operation is the Clear Physical File Member (CLRPFM) command. An example of an indirect clear-member operation is the Copy File (CPYF) command when the *REPLACE option is specified for the MBROPT keyword/parameter.
1. A file's trigger information is not copied to the new file when executing a CPYF command with CRTFILE(*YES). That is, the resulting newly-created file will not have any trigger programs attached to it.
2. Delete triggers are not called when the associated file is deleted (e.g., using the DLTF command).
3. To duplicate a file and its associated trigger programs to another library, and have the duplicated trigger programs associated with the duplicated file, first duplicate all the trigger programs, and then duplicate the file to the same library as the duplicated trigger programs. The system will automatically perform the re-association. Note: The duplicated objects should be given the same names as the original objects.
Operations that are invalid or not recommended in trigger programs
The following operations are not valid in a trigger program:
A commit or rollback operation for the record that caused the trigger to be called.
The End Commitment Control (ENDCMTCTL) CL command for the commitment definition being used for the record that caused the trigger to be called.
A trigger cannot update (or delete) the record that caused the trigger to be called.
SQL Connect, Disconnect, Release, and Set Connection statements.
In addition, IBM recommends not using the following commands in a trigger program. The commands can be used, but caution should be exercised.
Start Commitment Control (STRCMTCTL)
Reclaim Spool Storage (RCLSPLSTG)
Reclaim Resources (RCLRSC)
Change System Library List (CHGSYSLIBL)
Delete, Restore, or Save Licensed Program (DLTLICPGM, RSTLICPGM, or SAVLICPGM)
Save Library (SAVLIB) command with *YES specified for the SAVACT keyword/parameter.
Any command accessing a diskette or tape drive (because of long access times and the possibility that the wrong volume -- or no volume at all -- will be loaded).
Any migration commands.
Starting debug (a security exposure).
Any commands related to remote job entry (RJE).
Invoking/calling a program or CL command that results in an interactive entry screen (could reach lock resource limit).
The application of triggers to implement solutions for many data processing problems is limited by the imagination only. A trigger program can be attached to (or, associated with) any number of physical files using the ADDPFTRG command. You write the trigger program in the language of your choice. Once attached to a file, the program is called every time a record is deleted, inserted and/or updated. A trigger program is like any other program with a few restrictions on what it can do. Since the system will be calling the trigger program, its parameter list must be strictly coded. Other than that, a trigger can do just about anything a typical program might. And, the same trigger program can be attached to multiple files and to the same file multiple times.
Six categories of triggers The difference between the six types of triggers has to do with when they are called. Three record I/O events cause triggers to be called -- deletion, insertion and update. A trigger can be configured either so it is called before or after the database carries out the I/O event. That produces the following six possible combinations:
1. Before delete
2. After delete
3. Before insert
4. After insert
5. Before update
6. After update
The trigger parameter list
Programs destined for trigger-hood must accept exactly two parameters. The first, an input buffer data structure, will contain all the information associated with the event that caused the trigger to be called. The second parameter, a four-byte integer, contains the length of the input buffer (i.e., the first parameter).
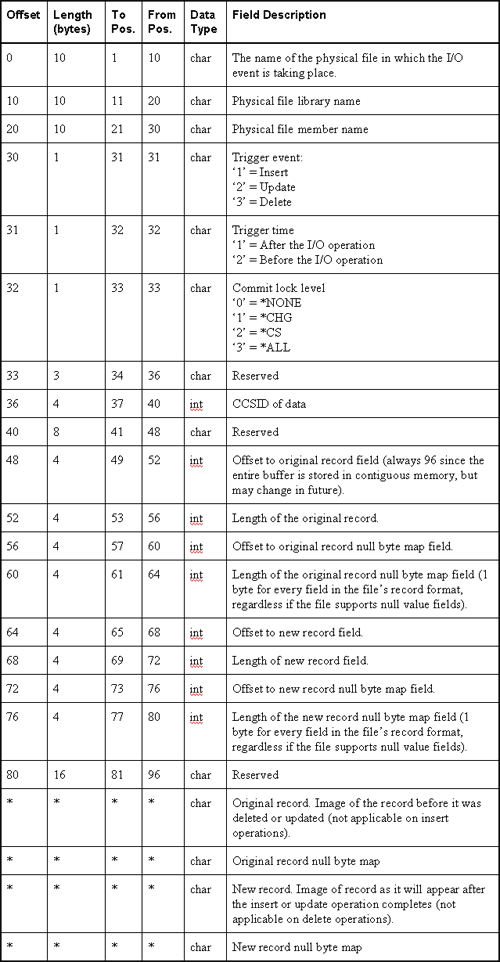
The chart below describes the layout of the input buffer parameter. Notice the last four fields of the input buffer structure. The offset, position, and length are not specified because it depends on the record length. Use the RPG SUBST op-code and the offset and length fields (positions 49-80 of the buffer) to extract the record images and null-byte maps. Note, SUBST requires a starting position not an offset, therefore, you must add a one to the offset to get a position. Alternatively, you can use pointers and based-on variables to make that process easier. When using pointers, you can use the offsets as-is to position the pointers to the proper place in the buffer.
Convert an excel file to EBCDIC and then upload to an AS/400 physical file
First method :
First, you need to run an interactive data transfer download from the Physical File (PF) to a PC data file.
The PF should be the file that you will eventually upload the excel data to. On this step, make sure that you change the output device to FILE, specify the path and filename and then click the DETAILS button.
On this screen make sure that the file type specified is that which you will eventually upload (in your case BIFF3 BIFF4 or BIFF5 depending on the Excel worksheet version you are saving the spreadsheet to). Also, make sure that the SAVE TRANSFER DESCRIPTION option is checked. This will create the FDF file which you will need for the next step.
Second, create a data transfer upload request.
Specify the PC data file you wish to upload (the Excel file), the PF you wish to upload to (the one you downloaded from in the previous step), and then click the DETAILS button.
Make sure the USE PC FILE DESCRIPTION FILE box is checked and that the name entered matches the FDF file that was created in the previous step. Select Translate fromANSI to EBCDIC. Make sure NO REPLACE MEMBER ONLY is specified in the create object section. Click OK out of DETAILS and run the upload.
Second method :
Another approach would be using the CPYFRMIMPF CL command.
1. Define target table with DDS or SQL. 2. Export Excel file into delimited format. 3. FTP delimited format file to your iSeries server. 4. Use CPYFRMIMPF CL command to load the delimited format file into the target table.
Q: I want to use PDM option 14 to compile my program, or run a user-defined option and retrieve the command later with F9=Retrieve. How can I do that?
A: The F9=Retrieve option works by retrieving certain types of messages from your job log. This means that for F9=Retrieve to work, you have to make sure that the commands that PDM runs get logged.
The first thing to check is in the PDM default settings. Press F18 from within PDM to change your defaults. Press the Page Down key to scroll to the second screen. There, you find the Log option commands setting. Make sure it's set to Y=Yes.
Here's what the second page of the F18=Options screen looks like:
                                Change Defaults

 Type choices, press Enter.

   Log option commands . . . . .  N            Y=Yes, N=No   <-- Set this to Y!
   Exit lists on ENTER   . . . .  Y            Y=Yes, N=No
   Display informational messages 2            1=Yes, 2=No
   Refresh part list . . . . . .  Y            Y=Yes, N=No
   Display source parts only . .  N            Y=Yes, N=No


                                                                         Bottom
  F3=Exit    F5=Refresh     F12=Cancel
You also need to make sure that your job is configured to allow logging. One easy way to turn this option on is to run the following command:
CHGJOB LOG(4 00 *NOLIST)
This changes your job so that all messages are logged to the job log. The CHGJOB command changes the logging level for the current job only, so if you sign off and back on again, you have to run that command again. However, you can change it permanently by changing your job description as follows:
After you make those two changes, the F9=Retrieve option should allow retrieval of the commands. For example, if I use option 14 to compile an SQLRPGLE program, I can press F9 to see the exact CRTSQLRPGI command that PDM ran.
One feature of the SNDMSG (Send Message) command is its ability to send a message to the system's history log, QHST. QHST automatically tracks high-level activities on your system, such as the start and completion of jobs, device status changes, system operator messages and replies, and PTF activity.
Sending messages to QHST can enhance application auditing. For instance, let's say you want to monitor a certain report to determine who uses it and how often. In a CL program that submits or executes the report, you could simply add a statement like this:
SNDMSG MSG('Report ABC requested by user' *BCAT &USER) TOMSGQ(QHST)
where &USER is a CL variable that contains the current user profile, which the program can retrieve by using the RTVJOBA (Retrieve Job Attributes) command. You could then display the contents of QHST by using the DSPLOG (Display Log) command.
The SNDPGMMSG (Send Program Message) command lets you perform this function as well. Experiment with these commands to see how sending messages to QHST can give you insight about the way your applications are being used.
The advantage of this method is as a field change of length then you do not need to re-calculate the start and end positions in the data structure.
Example :
Part of file definition LDA :
PHYSICAL: LDA EXTERNAL DEFINITION LOCAL DATA AREA (*LDA)
Field Length Text From To
RLSUSR 10 A USER NAME 1 10 RLSNBR 10 A JOB NO 11 20 RLSINL 10 A INLOGMENU 21 30 . . . LDFIL1 144 A FILLER 244 387 LDFIL2 256 A FILLER 388 643 LDFIL3 256 A FILLER 644 899 #SPJBQ 10 A JOB QUEUE 900 909 #SPOUT 10 A OUTPUT QUEUE 910 919
D-line in Rpg program :
D Lda E Ds Dtaara(*Lda) D Extname(Lda) * Incoming fields D Lda_Cnft 10A Overlay(LdFil2) D Lda_Sern 10A Overlay(LdFil2:*Next) D Lda_Cnno 7A Overlay(LdFil2:*Next) D Lda_Umcn 7A Overlay(LdFil2:*Next) D Lda_Cadn 6A Overlay(LdFil2:*Next) D Lda_Icno 6A Overlay(LdFil2:*Next) D Lda_Cfno 7A Overlay(LdFil2:*Next) D Lda_Lsta 2A Overlay(LdFil2:*Next) D Lda_Sysn 7A Overlay(LdFil2:*Next) D Lda_Ordn 10A Overlay(LdFil2:*Next) D Lda_Cnty 4A Overlay(LdFil2:*Next) D Lda_Bti1 1A Overlay(LdFil2:*Next) D Lda_Bti2 1A Overlay(LdFil2:*Next) D Lda_Btae 1A Overlay(LdFil2:*Next) D Lda_Vlcc 5A Overlay(LdFil2:*Next) D Lda_Srhn 30A Overlay(LdFil2:*Next) D Lda_Adr1 40A Overlay(LdFil2:*Next) D Lda_Town 25A Overlay(LdFil2:*Next) D Lda_Pscd 10A Overlay(LdFil2:*Next) D Lda_Tel 14A Overlay(LdFil2:*Next) D Lda_Drtr 8A Overlay(LdFil3) D Lda_Drfc 8A Overlay(LdFil3:*Next) D Lda_Drtc 8A Overlay(LdFil3:*Next)